Table Of Contents

Can SAS and Python be run in the same IDE? Many others feel the same way as you, and many analysts have expressed the same wish. The SAS Python package saspy makes it possible to use SAS in the Jupyter notebook.

SAS in Jupyter Notebook
SASpy it’s a python library that allows you to create a SAS session and run SAS code. It lets you move data between Pandas Dataframe and SAS Dataset flexibly.
For example, imagine you have data in a Pandas dataframe and want to run a SAS statistical procedure on it without having to switch between the SAS and Python environments.
But First, the Requirements
You don’t have to worry if you don’t have SAS software. SAS OnDemand for Academics lets you get it free without having to install anything. It is free for everyone who wants it (not restricted to students or academicians).
You need to sign up on the SAS On Demand website, and they will send you an email with a new user name. Then, you can log in using the username and password you created.
You should now be able to use SAS Studio without any trouble. Of course, you might not be able to do everything you want with the version of SAS you’re using, but at least you can change some data.
Steps to access SAS in Python (Jupyter)
saspy python package has the following dependencies :
Java 7 or higher
Python 3.4 or higher
Jupyter Notebook
SAS 9.4 or higher
You need to have Java 7 or higher installed on your system. The latest version of python can be downloaded from here.
Project Jupyter makes it easy to install and use by following the “instructions”:
{“https”://jupyter.org/install
These instructions only get you started with the Jupyter software and Python (the language it was originally built for).
To use SAS in Jupyter notebook, you must install the SAS kernel for Jupyter.These are the steps of installing and configuring sas_kernel.
Installing the SAS kernel
Within Jupyter, the sas_kernel provides multiple ways to access SAS programming methods.
Step “1”: First, you have to install sas_kernel using pip install.
Open the Mac terminal or Windows command prompt and enter the below command to install sas_kernel.
pip install sas_kernel
Step “2”: Find the path of the saspy module installation
The next step is to find the path of saspy installation. If you are unsure where to look, there is a very simple way to determine the location of your saspy installation.
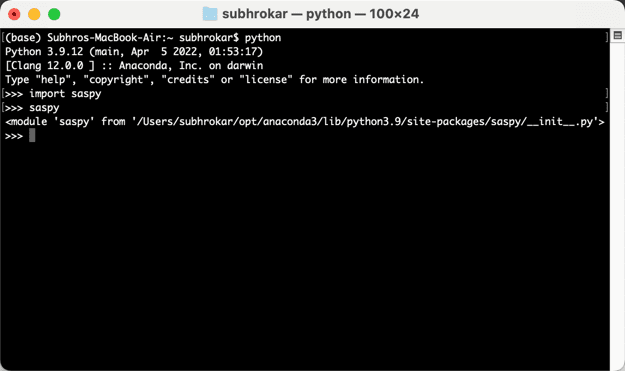
After installing, start Python and import saspy.
Then, simply submit saspy.
Python will show you where it found the module (it will show the __init__.py file in that directory). The directory is the module, so the sascfg.py file is in that directory, the same as __init__.py.
 saspy path in Macos
 saspy path in windows
Step “3”: SASpy Setup
To integrate with SAS OnDemand for Academics using this method, you “must”:
Create files to configure Python to access SAS OnDemand for Academics
Create sasacfg_personal.py containing the following information based on your SAS OnDemand for Academics Home Region.
Create _authinfo using the below as a template (.authinfo if on Linux or macOS).
These files need to be created and referenced only once.
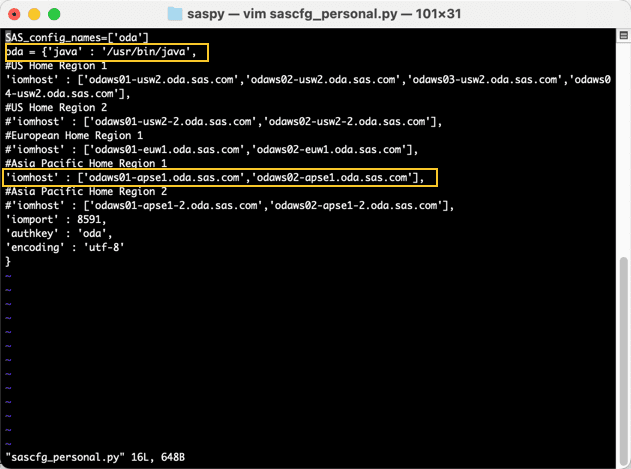
The sascfg_personal.py file
You can simply copy and paste the entire code block below. Be sure to uncomment only the ’
iomhost’ key for your home region. You can leave the other lines commented out or delete them.You will likely need to change the JAVA location (and if on Linux or macOS, the path would be more like ’
/usr/bin/java‘)The hostname of SAS OnDemand for Academics needs to be listed in
iomhostargument. Host name varies depending on your region. Open SAS OnDemand for Academics and check your region (which appears at the top right after you log in).
SAS_config_names=['oda']oda = {'java' : '"C":\\Program Files (x86)\\Common Files\\Oracle\\Java\\javapath\\java.exe',#US Home Region 1'iomhost' : ['odaws01-usw2.oda.sas.com','odaws02-usw2.oda.sas.com','odaws03-usw2.oda.sas.com','odaws04-usw2.oda.sas.com'],#US Home Region 2#'iomhost' : ['odaws01-usw2-2.oda.sas.com','odaws02-usw2-2.oda.sas.com'],#European Home Region 1#'iomhost' : ['odaws01-euw1.oda.sas.com','odaws02-euw1.oda.sas.com'],#Asia Pacific Home Region 1'iomhost' : ['odaws01-apse1.oda.sas.com','odaws02-apse1.oda.sas.com'],#Asia Pacific Home Region 2#'iomhost' : ['odaws01-apse1-2.oda.sas.com','odaws02-apse1-2.oda.sas.com'],'iomport' : 8591,'authkey' : 'oda','encoding' : 'utf-8'}
For macOS, open the terminal and enter the following cd command, followed by the SASpy installation directory.
cd <sas-py directory>
Now, enter the below command to create the file. using vim editor.
vim sascfg_personal.py
press ”i” to enter edit mode in the vim editor and paste the below codes.
Once editing your home location is done, press “:wq" to save and close the file.

In windows, using a text editor, create the file as below.
If your Java installation folder is different, Make sure to change the file location in java= argument above.

Save sascfg_personal.py to your SASPy installation location.

Creating an Authinfo file
You can use an authinfo file to sign on to SAS servers and spawners without having to specify credentials elsewhere.
Create the _authinfo file using the below as a template (.authinfo if on Linux or macOS).
oda user ODA_EMAIL or ODA_USERNAME password ODA_PASSWORD
You will need to change “ODA_EMAIL” or “ODA_USERNAME” and “ODA_PASSWORD” to your SAS OnDemand for Academics credentials.
In macOS, create the .authinfo file in your home directory by entering the following command in the terminal.;
sudo vim .authinfo
In Windows, open a text editor, and copy and paste the template as below.

Save _authinfo to your user’s home directory "c":\users\'your_username**'** on Windows.
“Note”: It is a requirement that the _authinfo file is in UTF8 encoding.
Connect to the SAS OnDemand for Academics Servers from Python
import saspysas_session = saspy.SASsession()
You may get a prompt to enter SAS University Edition credentials if the authinfo file is not created.
Once you enter both username and password, it shows a message like the one below.

Here is the mindmap of the complete steps.

From a Python prompt or another Python interface, like Jupyter Notebook, use the following commands to confirm a connection to SAS OnDemand for Academics.
To Start Jupyter Notebook on the command prompt, type
python -m notebook

If the browser doesn’t open up, copy and paste the below URL to launch the Jupyter notebook interface.
"http"://"localhost":8888/
The Magic : Running the SAS Procedures in Jupyter Notebook
proc print data=sashelp.cars(obs=5) ;run;
It returns the output as follows.

Another example of using Python functions on SAS datasets.

The %%SAS magic command
%%SAS magic command lets you submit SAS codes directly with SASPy when imported, rather than be interpreted as Python code, but will still be colour-coded as Python syntax.
In other words, %%SAS is a convenient way of invoking SAS in the middle of a Python
notebook
%%SASproc print data=sashelp.class(obs=5);run;

Running SAS Procedures on Python dataframe objects.
Creating a sample dataframe - Below, we are creating a dataframe in python and will use proc means to find the means of the numbers.
data = [10,20,30,40,50,60]df = pd.DataFrame(data, columns=['Numbers'])df
%% SAS sas magic won’t work here, so instead, you can use sas.submitLST() as shown below.
sasdf = sas.df2sd(df, 'sasdf')sas.submitLST("proc means data=work.sasdf (obs=5);run;", method='listorlog')
The submit method returns a dictionary with two “keys”: LOG and LST. You can print() the LOG and sas.HTML() the LST.
There are two methods, df2sd and sd2df, by which a data set may be transferred between SAS and Python.
df2sd stands for dataframe2sasdata and sd2df stands for sasdata2dataframe.

